How To Airbrush Nails
How to Airbrush Nails
Someone can airbrush nails for fun, and they look great! Airbrushed nails are a popular trend in the beauty world. Airbrushing nails is a great way to create a flawless manicure that lasts. Fingernail airbrushing is a quick and easy way to apply polish without the mess. Airbrushing nails is a new way to get creative with your manicure. It’s similar to airbrushing your face, in that it uses a spray bottle and makeup brushes, but instead of applying makeup, you’re applying nail polish.
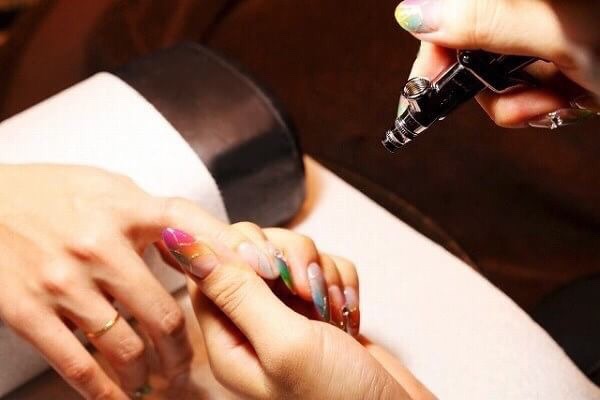
The process is simple, but it takes practice to master. It’s important to be careful when airbrushing your nails by keeping eye safety and more in mind, and not to ruin your manicure.
Airbrushes for nails are made from soft rubber and have a needle tip for painting the nail. They come in several sizes, from small to large. The smaller sizes are easier for small fingers and toes, while larger ones will work on hands or feet of any size. A solid nail airbrush kit will include everything you need like:
– Nail file, buffer brush, or polishing wheel
– Nail polish remover or acetone
– Nail polish remover pads
– An oil-based base coat
– A clear top coat or glitter coat
– A variety of paint colors
– Flat brush/large brush (for cleaning)
– A nail airbrush gun
Airbrushing your nails is a great way to get a beautiful, long-lasting manicure. It's also super-easy to do at home!
Here’s our step-by-step guide that will help you learn how to airbrush your nails and hands!
1. Prep Your Hands
Before you begin, prepare your hands by washing them with soap and water and drying them off completely with a clean towel. Pat dry so there’s no moisture left on your skin, which could cause streaking in your polish application later on. Then prep your nails with acetone and a cotton swab or nail polish remove pad (which will help remove any residue on the nail). You can apply a plastic wrap around the edges of each finger you plan to apply an airbrush nail design to, which will help with drips, smearing, and smudges.
2. Prime Your Nails with a Base Coat
Next, prime your nails with an oil-based base coat of polish to protect it from getting ruined by the airbrush paint. This will help make sure that the colors you choose to paint on top of it stay put for longer as well. Let this dry for about five minutes before proceeding to step three of this tutorial for how to airbrush nails and hands!
3. Apply Top Clear Coat To Your Nails (Glitter Optional)
Now, apply a glitter, clear top coat over all of your nails. This will give each nail an even layer of glitter, and will help protect them against chipping and cracking. Let this dry fully before removing the plastic wrap from around the edges of your nails so they can dry completely without smudging!
4. Airbrush Nails with Color and Designs
You can cut out stencils from paper to create unique designs. Be sure that they are big enough to cover your entire nail bed, but not so large that they overlap at the edges. You can use a small dotting tool or toothpick to create individual dots on top of each stencil. Make sure each dot is uniform in size!
Now is the time to grab an airbrush gun and a color of paint you like. This is the fun part: airbrushing! Apply the paint to your nail using quick, light strokes in one direction only (no back and forth). Airbrushing applies a fine mist of paint or liquid onto your nail. If you are using stencils, be sure to swap them between colors so you don’t cover up your previous work. Once you have completed your design, let your airbrushed nails dry for a couple minutes, and show it off to everyone.
Enjoying your perfectly manicured nails
Airbrushing nails is a great way to get the look you want without having to wait for your polish to dry. It’s much faster than standard nail polish application, which may be an important consideration if you’re in a hurry or just not a fan of waiting around for your nails to dry. Learning how to airbrush nails requires a bit of practice, but once you get the hang of it, you’ll love it. It’s great for adding fine details to your artwork, and giving your nails that professional look at home. If you become quite good at airbrushing your nails, and have the ambition, you can start an entire business to generate a new source of income by airbrushing makeup and nails for people.
USEFUL RESOURCES FOR AIRBRUSHING
Thin Acrylic Paint for Airbrushing
Acrylic paints are great for airbrushing because they’re water-soluble and can be thinned with water.
Airbrush Flames
Airbrushing flames on cars, motorcycles, shirts, and people is a popular customization for people who want to add some personal flair to their ride or styles. This guide will walk you through all the steps of the process, so that you can be confident in your abilities!
How to Clean Your Airbrush
It is very crucial to properly clean your airbrush and make sure that it stays smoothly functioning and operating. If you are a beginner, then you probably won’t have any idea about how to clean airbrush.
Airbrush for Beginners
For a beginner, it’s not a big deal to master airbrushing. It’s merely a game of determination and practice.
Airbrushing Ideas
Airbrushing IdeasAirbrushing is a great way to add a bit of fun and flair to any project, and these ideas are sure to help you get started. Easily add a bit of extra flair to your t-shirts, nails, makeup, cakes, or tattoos with our airbrushing...
Compressors
Airbrush compressors are the heart of an airbrushing system. They are used to provide a constant flow of air to your airbrush. The air is supplied from an air tank, which is filled with compressed air. Airbrush compressors create a constant, steady flow of air that is needed by your airbrush to produce fine lines and detailed artwork.

